User guide
Get the details about VYALEV dosing, pump features, and important treatment initiation steps.


User guide
Get the details about VYALEV dosing, pump features, and important treatment initiation steps.

Educational videos
See how to program the pump, make dose adjustments, and administer VYALEV.

Infusion guidance
Review VYALEV administration steps and guidance on proper infusion site care.
Coverage lookup and access resources
Initial Dose Programming
See how to program the VYALEV Pump and set an initial dose for your patients.
Confirming & Adjusting Doses
See how to confirm doses prior to treatment initiation and make adjustments as needed.
The 5 Ps of VYALEV Administration
See how to administer VYALEV in 5 steps in this video.
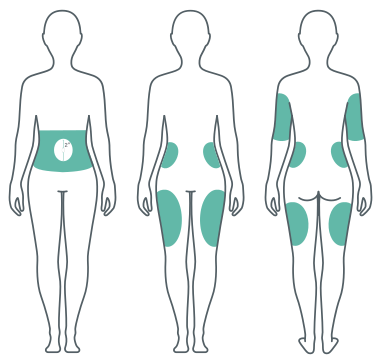
Infusion site selection: Select intact skin, free of irritation; avoid scarred tissue, broken skin, stretch marks, bony areas, highly mobile areas, or skin folds.2-4 Choose a site where you can pinch at least an inch of skin and fat.2
The abdomen is a commonly used site, staying at least 2 inches from the navel. Select new infusion sites at least 1 inch from sites used within the previous 12 days.1 The upper arm, thigh, and flank may be utilized.1,2,5*
*In a phase 1 study, healthy volunteers were administered VYALEV to different subcutaneous sites (ie, abdomen, arm, or thigh) using a 3-way crossover design. Pharmacokinetic analysis from this study showed that the 3 sites provided comparable CD and LD exposure, suggesting that VYALEV absorption is similar at the different subcutaneous sites.1
Infusion site preparation
Always clean the infusion site with water and antibacterial soap, followed by an alcohol pad prior to cannula placement, and ensure clean routine(wash, wipe, wait).1-3

Wash hands with antibacterial soap and water. Clean the intended infusion site with water and antibacterial soap.2,4

Using clean hands, wipe the infusion site with an alcohol pad in an outward spiral motion—not back and forth—to avoid introducing bacteria into the site.2,4

Allow the infusion site to air-dry for at least 60 seconds prior to cannula placement to ensure proper adhesion. Do not blow on or fan the area to accelerate drying.4,6
Cannula placement, rotation, and removal

Consider a pattern when rotating the infusion site.
Place cannula correctly: The 9-mm cannula is generally preferred, as it may help minimize dislodgement.3 Use 2 fingers to pull the skin tight and insert the cannula at a 90-degree angle, secure the site properly, and change the site if pain, irritation, or pooling occurs.1,3 Directly insert at site that was cleaned.4,6 Cover the infusion site with transparent film dressing (ie, TEGADERM®, OPSITE®) to secure the cannula and protect the site.3
Rotate and remove the cannula: Rotate the infusion site and use a new infusion set (tubing and cannula) at least every 3 days.1 Consider having patients rotate their cannula daily until good skin tolerability is achieved.2,3 After that, consider rotating at least every 3 days.1 If VYALEV has been stopped for more than 1 hour, rotate the infusion site and use a new infusion set (tubing and cannula).1 Leave previous cannula in place for 1 hour, and after removal, care for the skin by gentle massage (only on healthy skin) and consider applying a protective dressing.3 Select new infusion sites at least 1 inch from sites used within the previous 12 days.1
Develop a plan
Patients: Regularly monitor infusion sites and seek prompt medical attention for spreading redness, pain, swelling, warmth, color change with pressure, or signs of fever.1-3,6
HCPs: Develop a proactive plan with your patient to know who and when to call for help if symptoms worsen.1
TEGADERM® is a registered trademark of Solventum.
OPSITE® is a registered trademark of T.J. Smith & Nephew Limited.
Telemedicine support is now available for your patients. They can connect virtually with a licensed healthcare provider for help managing infusion site events for $35 per visit.
AbbVie does not, in any way, endorse or recommend the qualifications of any physician associated with the third-party website or the quality of medical care any of those physicians can provide.
The 5 Ps of VYALEV administration1,4
Review the 5 Ps (Plan, Prepare, Prime, Place, and Pump) and use them to help set your patients up for successful administration.

PLAN it out
Clean your hands and working surface. Then, gather all the supplies.


PREPARE the syringe
Transfer all the medication from the vial to the syringe using the vial adapter. Attach the tip of the syringe to the tubing and place the full syringe inside the pump.


PRIME the tubing
Fill the infusion tubing with medication before connecting the cannula to the body.


PLACE the cannula
Place the cannula on clean skin using the insertion device. Connect the tubing to the cannula.


PUMP the medication
Start the pump to deliver the medication.

The infusion set may look different from the one shown here.
The medication vial, vial adapter, and syringe should be replaced at least once per day. The tubing, cannula, and insertion device should be replaced at least once every 3 days.
Get answers to frequently asked questions about VYALEV.
VYALEV is indicated for the treatment of motor fluctuations in adults with advanced Parkinson’s disease (PD).
VYALEV® (foscarbidopa/foslevodopa) is contraindicated in patients who are currently taking or have taken (within 2 weeks) a nonselective monoamine oxidase (MAO) inhibitor, as concurrent use can cause hypertension.
Falling Asleep During Activities of Daily Living and Somnolence: Patients treated with levodopa (the active metabolite of VYALEV) have reported falling asleep while engaged in activities of daily living, including the operation of motor vehicles, which sometimes resulted in accidents. Although many of these patients reported somnolence while on levodopa, some perceived that they had no warning signs, such as excessive drowsiness, and believed they were alert immediately prior to the event (sleep attack). Some of these events have been reported more than one year after initiation of treatment. For this reason, prescribers should continually assess VYALEV-treated patients for drowsiness or sleepiness. Advise patients about the potential to develop drowsiness with VYALEV and ask about factors that may increase risk of somnolence. Consider discontinuing VYALEV in patients who report significant daytime sleepiness or episodes of falling asleep during activities that require active participation. If VYALEV is continued, patients should be advised not to drive and to avoid other potentially dangerous activities that might result in harm if the patient becomes somnolent. There is insufficient information to establish that dose reduction will eliminate episodes of falling asleep while engaged in activities of daily living.
Hallucinations/Psychosis: There is an increased risk for hallucinations and psychosis in patients taking VYALEV. Hallucinations associated with levodopa may present shortly after the initiation of therapy and may be responsive to dose reduction of VYALEV or other concomitantly administered medications. Patients with a major psychotic disorder should not be treated with VYALEV.
Impulse Control/Compulsive Behaviors: Patients may experience intense urges while on VYALEV. Because patients may not recognize these behaviors as abnormal, it is important for prescribers to ask patients or their caregivers specifically about the development of new or increased gambling urges, sexual urges, uncontrolled spending, binge or compulsive eating, or other urges while on VYALEV. Consider reducing the dose or discontinuing VYALEV if a patient develops such urges.
Infusion Site Reactions and Infections: VYALEV can cause infusion site reactions and infections. Various types of reactions at the infusion site have been reported, including erythema, pain, edema, nodules, warmth, swelling, and others. The most frequent infusion site infection reported was cellulitis. If an infection is suspected at the infusion site, the cannula should be removed. In such a case, either a new cannula should be placed at a new infusion site or, in the event of a prolonged interruption, prescribe an oral carbidopa/levodopa product until the patient is able to resume VYALEV.
Withdrawal-emergent hyperpyrexia and confusion, a symptom complex that resembles neuroleptic malignant syndrome (characterized by elevated temperature, muscular rigidity, altered consciousness, and autonomic instability), with no other obvious etiology, has been reported in association with rapid dose reduction, withdrawal, or change in dopaminergic therapy. Avoid sudden discontinuation or rapid dose reduction of VYALEV.
Dyskinesia: VYALEV may cause or exacerbate dyskinesias, which may require a dose reduction of VYALEV or other medicines used to treat Parkinson’s disease.
Vitamin B6 Deficiency and Seizures: Treatment with carbidopa/levodopa (the active metabolites of VYALEV) may contribute to reduced vitamin B6 levels and higher doses of carbidopa/levodopa may increase the risk. Seizures associated with vitamin B6 deficiency have been reported in patients taking carbidopa/levodopa. Evaluate vitamin B6 levels prior to initiation of VYALEV and during treatment or if symptoms of vitamin B6 deficiency are identified and supplement with vitamin B6 as necessary.
Cardiovascular Ischemic Events: Myocardial infarction and arrhythmia were reported in patients taking carbidopa/levodopa (the active metabolites of VYALEV). Ask patients about symptoms of ischemic heart disease and arrhythmia, especially those with a history of myocardial infarction or cardiac arrhythmias.
Glaucoma: Monitor patients with glaucoma after starting VYALEV as it may cause increased intraocular pressure.
The most common adverse reactions for VYALEV that occurred in ≥3% of patients, and at least 2% difference from oral immediate-release carbidopa/levodopa, were infusion/catheter site reactions, infusion/catheter site infections, hallucinations, dyskinesia, On and Off phenomenon, balance disorder, constipation, peripheral swelling, agitation, insomnia, psychotic disorder, and dyspnea.
VYALEV (foscarbidopa and foslevodopa) injection for subcutaneous use is available in a 120 mg foscarbidopa and 2,400 mg foslevodopa per 10 mL (12 mg foscarbidopa and 240 mg foslevodopa per mL) solution.
Please see full Prescribing Information.
US-VYAL-260137
References
1. VYALEV [package insert]. North Chicago, IL: AbbVie Inc. 2. Fung VSC, Aldred J, Arroyo MP, et al. Continuous subcutaneous foslevodopa/foscarbidopa infusion for the treatment of motor fluctuations in Parkinson's disease: considerations for initiation and maintenance. Clin Park Relat Disord. 2024;10:100239. doi:10.1016/j.prdoa.2024.100239 3. Ray Chaudhuri K, Bergmans B, Freire-Alvarez E, et al. Considerations for initiation and maintenance of foslevodopa/foscarbidopa for advanced parkinson’s disease. Mov Disord Clin Pract. Published online January 16, 2026. doi:10.1002/mdc3.70489 4. VYALEV Patient Pump Instructions for Use. North Chicago, IL: AbbVie Inc. 5. Han YR, Jeong A, Ayub K, et al. Bioequivalence of Foslevodopa/Foscarbidopa continuous subcutaneous infusion to arm, thigh, or flank versus abdomen in healthy and advanced Parkinson’s disease individuals. Clin Park Relat Disord. 2025;13:100359. doi:10.1016/j.prdoa.2025.100359 6. Convatec. Instructions for Use for the NeriaTM Product Range of Infusion Sets. Accessed May 2026. https://www.neria.com/about-neria/instructions-for-use/